A First Community Craft Swap: Set Up a Table People Can Browse
A community craft swap works best when zones, labels and browsing routes are clear, helping visitors choose materials at their own pace without crowding.
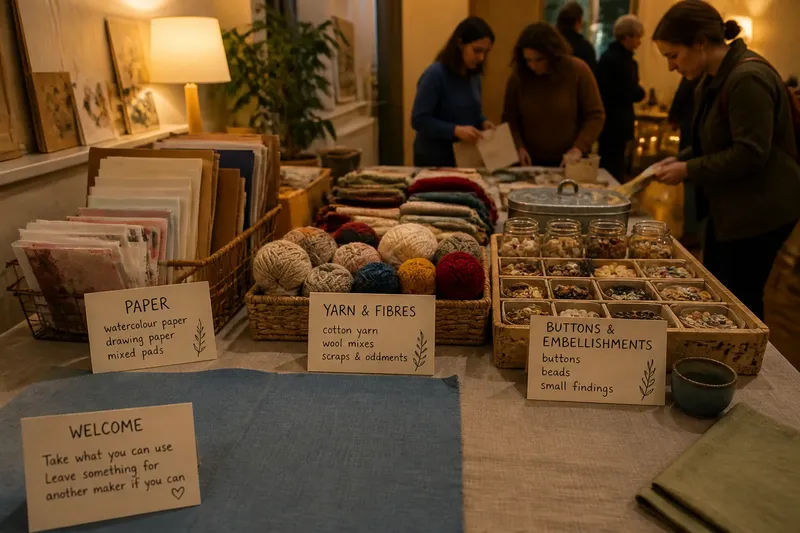
Where should someone look first when they arrive at a community craft swap? A clear table plan answers that question before a host has to. Divide the surface into recognisable zones, label materials in plain language and leave enough room for people to browse without feeling hurried. The aim is not a miniature shop or a lesson; it is an easy invitation to exchange useful creative supplies.
Give the table a simple visual map
Begin with the shape and location of the table. A long trestle beside a wall can be browsed from one side; a central table may allow access from several sides, but needs open routes around it. Avoid placing the swap where people must cross a doorway, queue for refreshments or squeeze past chairs. A welcoming display still needs space for visitors to pause.
Use broad categories that make sense at a glance. Fabric and yarn might share one end, while paper, drawing tools and small embellishments occupy another. Put tools that need careful handling apart from loose materials that people are likely to pick up. If the gathering is small, three or four zones are usually easier to understand than a complicated map of tiny categories.
Give each zone a visible boundary without building a barrier. A sheet of plain paper under small notions, a shallow tray for buttons, or a strip of coloured card at the edge can mark a section. Keep the materials themselves visible; deep boxes and opaque bags turn browsing into rummaging and make it harder to see what is available.
Leave a little unfilled surface between zones. That gap helps the eye distinguish categories, and it gives a visitor somewhere to set down an item while comparing it with another. Filling every inch may look abundant at the start, but it can make the table difficult to use as soon as several people arrive.
Keep labels useful and modest
A useful label answers the questions a visitor is likely to have: what is this, what condition is it in, and is there anything practical to know before taking it? Use ordinary terms such as “cotton offcuts,” “wooden beads” or “watercolour paper” rather than a private shorthand familiar only to the person who brought the material.
When a detail affects how the item can be used, make it easy to see. A bundle of fabric might be marked “washed, mixed colours”; a packet of paper could say “lightweight, suitable for drawing.” If the exact composition or use is uncertain, say so plainly rather than guessing. A visitor can then decide whether the material suits their project.
Write labels large enough to read while standing, using dark ink on pale card. Place them at the front of the zone, not underneath a pile or facing only the host. Reusable tent cards or masking tape on trays are practical choices; elaborate signs rarely add much to a small gathering.
Say you are hosting in a library room with a narrow entrance and expect neighbours to bring yarn, paper and buttons. Put paper on the wall-side end, yarn in a shallow basket near the middle, and buttons in a lidded tray at the far end. Three handwritten cards identify each zone, while a blank patch near the entrance gives arrivals room to stop and orient themselves. The likely result is a table that can be understood without an announcement, even as people come in at different times.
Make the browsing route feel unhurried
Arrange the table so that visitors can approach, look, make a choice and move away without blocking the next person. If people can browse from both sides, keep the most fragile or easily scattered items away from the narrowest passage. If the room only permits a one-sided arrangement, leave a clear way to step back rather than asking everyone to travel in a single tight line.
A host can help by standing beside the table rather than behind it. That position leaves the materials open to view and makes it easier to answer a question without appearing to control who may touch what. A small sign can explain the exchange in one sentence, such as “Choose what you can use; leave something for another maker if you can.” Adapt the wording to the gathering’s agreement rather than implying rules that have not been discussed.
Keep a small “not sure” area only if it solves a real problem. It can hold items whose category is unclear or whose condition needs a closer look, but it should not become a dumping place. A host can review it occasionally and move items to a suitable zone, or take them home if they are not appropriate for sharing.
It is not worth trying to arrange every spool, button or scrap into a perfect colour order. That kind of sorting takes attention away from welcoming people, and the display will change as soon as browsing begins. Aim for legible groupings, not a still-life arrangement that nobody feels free to disturb.
Agree on what can be shared
Before inviting contributions, decide what counts as suitable for this particular swap. One group may welcome partly used supplies; another may prefer unopened materials or clean, usable offcuts. State the agreement in the invitation so people do not have to guess, and provide a simple alternative for anything that does not fit, such as keeping it at home for another occasion.
Separate materials that need special care from ordinary supplies. Needles, blades, solvents and other potentially hazardous items should not be casually mixed into a public browsing table. For safety-sensitive materials, follow the relevant product label, manufacturer guidance and local rules; if there is doubt, leave the item out. A craft swap does not need to accept every kind of object to be generous.
Consider whether containers should stay with the contributor or be offered as part of the exchange. A jar of beads or a box of scraps may be useful, but the owner might want the container back. A brief note on the label can settle that small ambiguity and prevent an awkward conversation at the end.
It also helps to say what happens to leftovers. The group might invite contributors to reclaim their own materials, arrange for a named community space to receive suitable supplies, or ask everyone to take home what they brought. Choose a plan before the event and communicate it plainly; otherwise the host can be left with a pile whose ownership is unclear.
What should a first-time host decide?
How many zones should the table have?
Use enough zones to distinguish the main kinds of material, but not so many that visitors need to study a directory. Start with broad families such as fibres, paper and small components, then split a category only if the quantity or handling needs make that useful.
Should people bring finished crafts as well as supplies?
That depends on whether the gathering is meant to exchange materials, handmade objects or both. Keeping the invitation specific helps guests pack appropriately and keeps the table’s categories coherent.
What should happen if a visitor wants an item but has nothing to trade?
Decide whether the swap is a direct exchange, a shared free table or a mixture, and explain that arrangement before people arrive. A clear agreement is kinder than leaving a visitor to infer whether taking an item is acceptable.
How can a host make room when the table gets crowded?
Keep a spare tray or basket beneath the display for replenishment, rather than stacking every contribution on the surface at once. Add items as space opens, and invite visitors to step aside while they consider a choice.
End with a table that can be reset
A modest reset plan makes the event easier to close. Keep spare cards, a marker and a few empty trays nearby so a host can restore a clear category when a pile becomes mixed. This is not a demand for constant tidying; it is a way to keep the table readable without interrupting conversation.
At the end, follow the agreed plan for leftovers and check that personal containers return to their owners. If the gathering will happen again, note only what would improve the next table: perhaps the paper zone needs a larger sign, or the entrance side needs more breathing room. Those observations are more useful than trying to preserve a perfect record of every item.
A first community craft swap does not need a decorated venue or a host who can explain every material. Its success rests on small acts of clarity: visible categories, honest labels, a route that leaves room to pause and an agreement people can understand. When those details are in place, the table itself can do much of the welcoming.